Simulator · runs in the browser · free to open
Arduino Simulator: Trace a 3D Uno and Run Real Code in Your Browser
An Arduino simulator puts the board, the breadboard and the sketch on one screen. Each of the 16 lessons arrives with its circuit already wired: you trace the jumpers on a 3D Arduino Uno R3, open any part to read its pin roles and ratings, press Run, and watch the same C++ sketch you would paste into Arduino IDE 2.x switch pins and print to a serial monitor — with nothing to install and no board to buy.
Ready to look at the board? It opens in one click and lesson 1 needs no account.
Open the 3D simulatorA free 3D Arduino simulator
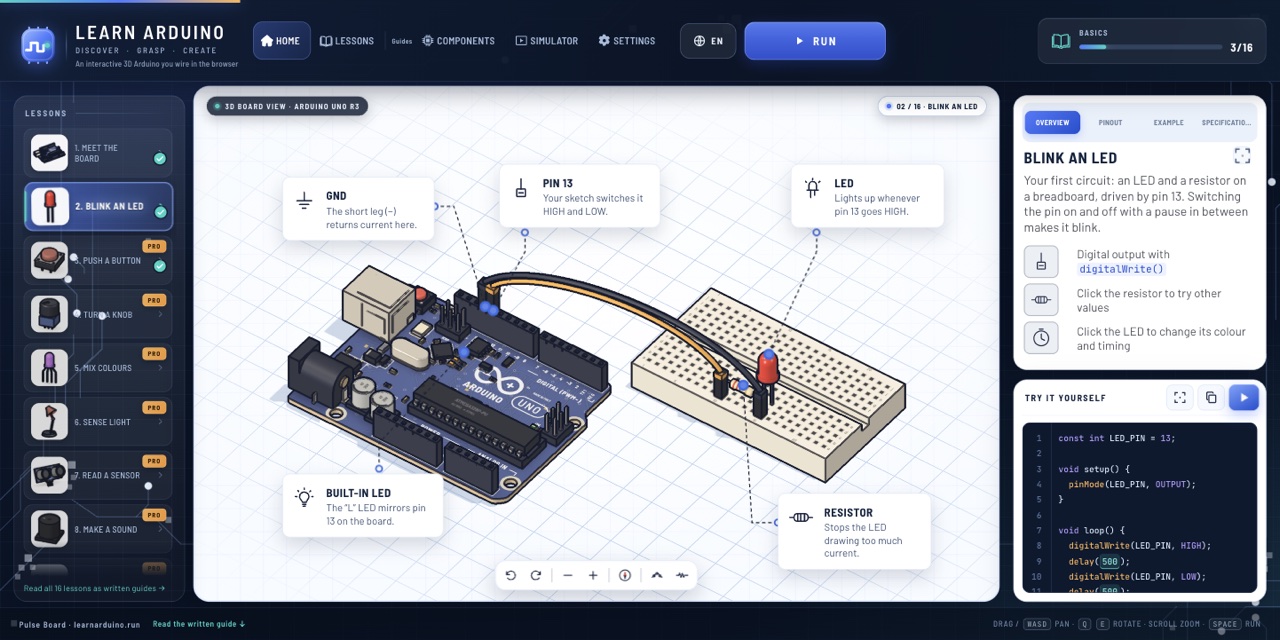
The board in the middle of the screen is not a picture of an Arduino. It is a Three.js model built part by part — the ATmega328P in its DIP socket, the USB-B socket, the barrel jack, the two pin headers, the reset button, the four LEDs — at the Uno's real 68.6 × 53.4 mm footprint. Next to it sits a 400-point breadboard with the same tie-point layout as the physical part, and the jumper wires between them are drawn where they actually run: out of D13, over the header, into a row of holes.
You move the way you would move a real board under a desk lamp. Drag to pan, Q and E to rotate, the wheel to zoom, R to reset, and the minimap in the corner to jump across the bench without losing your place. Click a component and it opens: the LED offers a colour, the resistor offers a value, a jumper reports what it carries, and the board offers its four data tabs — Overview, Pinout, Example and Specifications. That is the whole interface, and none of it needs an install, an account or a WebGL-capable gaming machine.
What an Arduino circuit simulator has to get right
The difference between a useful Arduino circuit simulator and an animated diagram is whether the numbers hold. A pin that is not the pin you thought, a resistor that does not limit current, an analog reading that tops out at the wrong count — any of those teaches a habit you have to unlearn on real hardware. So the model follows the Uno R3 datasheet rather than the drawing: 14 digital pins, 6 of them PWM on D3, D5, D6, D9, D10 and D11; 6 analog inputs reading 0–1023 across 0–5 V, which is 4.88 mV per count; 20 mA comfortable per pin and 200 mA across the whole port.
Those limits are what make the wiring view worth reading carefully. A red LED drops about 2 V, so a 220 Ω resistor in series with a 5 V pin leaves roughly 14 mA — bright, and inside the pin's rating. Put the same resistor in parallel with the LED, as plenty of first attempts do, and the LED sees the full 5 V with nothing limiting it; that is why the lesson on LED wiring spends three paragraphs on which side of the LED the resistor sits. The table below is what the model reproduces, and where it stops.
| Behaviour | In the simulator | On a real Uno R3 |
|---|---|---|
| Pin map | D0–D13, A0–A5, PWM on 3, 5, 6, 9, 10, 11 | Identical silkscreen |
| Analog reading | Clean 0–1023, 4.88 mV per count | Same scale, jitters by one or two counts |
| Supply | Ideal 5 V, no brown-out | Regulator sags under a 400 mA load |
| Wiring mistakes | Reversed LED, missing ground: accepted | Reversed LED: dark; missing ground: nothing works |
| Sensor noise | None — the HC-SR04 echo arrives clean | 2 cm blind zone, 2–400 cm usable range |
| Timing | delay() and millis() in simulated time | 16 MHz crystal, ±30 ppm |
Practice Arduino wiring without hardware
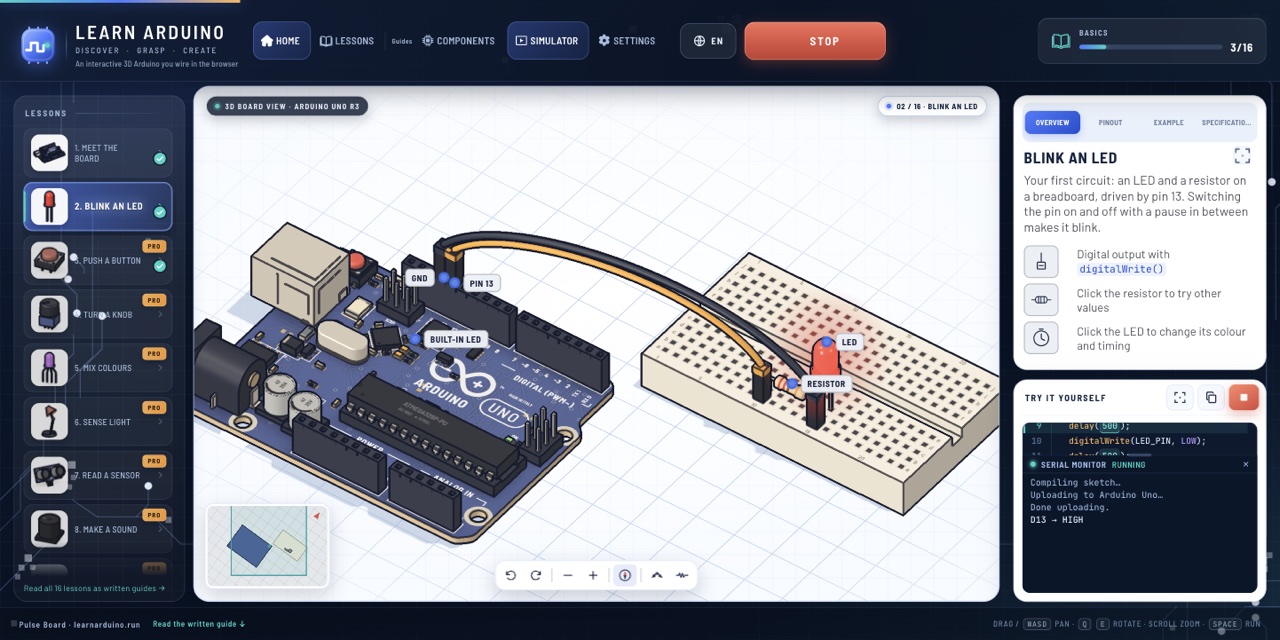
Wiring is the part beginners get stuck on, and it is the part a book cannot show. Which row of the breadboard is connected to which, whether the LED's long leg goes to the pin or to ground, where the resistor sits in the chain — these are physical questions, and the usual answer is "buy a kit and find out". The 3D view is the middle path: every lesson's circuit arrives wired on the board, and what you practise is the skill that actually trips people up — reading a connection, not holding the jumper. Click a jumper and the inspector tells you what it carries; click the resistor and it gives the value and what it is limiting; the LED tells you which leg is the anode. Put that beside the wiring table on the lesson page and every row has something to check against.
Lesson 2 is the whole method in one circuit. Pin 13 leaves the header, a jumper carries it to the breadboard, a 220 Ω resistor bridges the centre gap, the LED's anode takes the resistor's far leg and its cathode returns to the ground rail, which runs back to a GND pin on the board. Four connections, one loop. Trace it once in 3D and every later circuit is a variation of it: a button on pin 2 with a 10 kΩ pull-down, a potentiometer's wiper on A0, an LDR in a voltage divider, an HC-SR04's Trig and Echo on two digital pins.
Being straight about the limit: this is a guided, pre-wired board, not a drag-and-drop sandbox. You cannot move a jumper from one hole to another on the 3D model. What you can do is read a circuit quickly, change a component value and see the consequence in the next run, and execute the sketch — then rebuild the same table on a real Uno with the parts list from the lesson.
Interactive wiring practice
Interactive here means every object on the board answers a click, and the answers are the lesson:
- Click a part to inspect it. The board opens four tabs — Overview, Pinout, Example, Specifications — and each component opens its own sheet: rated current, forward voltage, pin roles, the value you should be using.
- Click a jumper. It reports what a jumper wire is for and zooms to the connection, which is how you find the one wire you are unsure about instead of squinting at the whole loom.
- Change the parts. Swap the LED colour, change the resistor, and the circuit's behaviour follows in the next run rather than in a footnote.
- Overlay the schematic. One toggle draws the same circuit as a schematic, so the breadboard picture and the symbols you meet in a datasheet stop being two different languages.
- Follow the current. The flow toggle animates charge moving from the 5 V pin, through the resistor and the LED, back to ground — the direction that half of all first attempts get backwards.
- Keep score. The progress rail counts the 16 lessons you have finished, and each one is labelled with the pin or part it introduces.
Panning across the breadboard while a callout explains a row is how the tie-point rule — "each short row of five holes is connected underneath" — stops being a sentence and becomes something you can see.
Real Arduino code execution in the browser
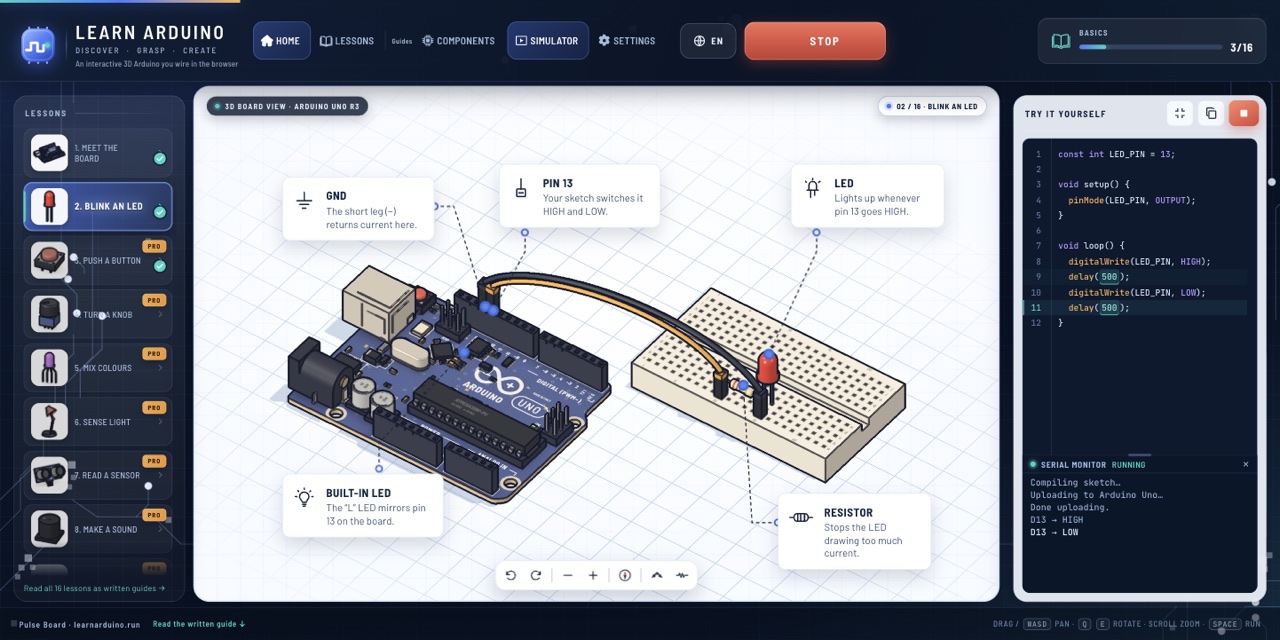
The sketch in the right-hand panel is ordinary Arduino C++. Nothing is translated, shortened or replaced with a pseudo-language, so the 12 lines that blink an LED in the simulator are the 12 lines that compile for an ATmega328P. Press Run and the panel reports Compiling sketch…, Uploading to Arduino Uno…, Done uploading. — the three steps you would see in the IDE — then the serial monitor starts printing, one line per pin change: D13 → HIGH, D13 → LOW, once every 500 ms, exactly as fast as the two delay() calls allow.
// the 12-line sketch lesson 2 runs
const int LED_PIN = 13;

void setup() {
  pinMode(LED_PIN, OUTPUT);
}

void loop() {
  digitalWrite(LED_PIN, HIGH);
  delay(500);
  digitalWrite(LED_PIN, LOW);
  delay(500);
}
Execution is what makes an Arduino simulator different from an animation. The sketch's pin writes are applied to the modelled circuit, so the LED lights on the frame where D13 goes HIGH and goes dark where it goes LOW, and any Serial.print() lands in the monitor in order. It is not a cycle-exact AVR emulator: timing is simulated, the supply is ideal and there is no interrupt jitter, which is why every lesson ends by telling you to take the wiring table to a real board and calibrate the numbers there. What it does give you is the loop — change a pin, run, read the output, change it back — without a cable, a compile time of ten seconds, or the risk of putting 5 V where 3.3 V belongs.
Learn electronics by building circuits in 3D
The 16 lessons are one continuous build rather than 16 disconnected demos. The first five cover the pinout, a digital output, a digital input with INPUT_PULLUP, an analog input from a 10 kΩ potentiometer, and PWM on three pins. The next six turn readings into numbers — an LDR divider, an HC-SR04 whose echo time you divide by 58, a piezo and tone(), eight buttons and an array of notes, a TIP120 driving a 200 mA motor, a TMP36 at 10 mV per °C. The last five are motion and a finished project: an SG90 servo on a 1–2 ms pulse, a 28BYJ-48 with its 2048 half-steps per revolution, a capacitive soil probe, an FSR 402, and a traffic light that switches on distance.
That order is the reason the 3D view works as teaching rather than decoration. Every lesson reuses the wiring from the one before, so the board fills up the way a real one does, and by lesson 16 you are reading a circuit you have already traced five times in smaller pieces. Start with Arduino Uno Pinout, Blink an LED on Arduino, Arduino Push Button, Arduino Force Sensor (FSR 402), Arduino Uno Projects and the rest follow in the rail.
Learn Arduino online simulator: how to actually use it
If you came here to learn Arduino online, the simulator is the practice half of the course and the written guides are the reference half. The order that works is the order the lessons are numbered in: lesson 1 for the pinout, lesson 2 for the first output, then one new part per lesson until the traffic-light project at 16. Read the wiring table on the matching guide page first, then open the same circuit here and press Run — the table stops being a diagram and starts being a thing that lights up when you change a pin.
Three habits make the browser a real place to learn rather than a demo. Change one value at a time — the resistor from 220 Ω to 1 kΩ and watch the LED dim — because that is how the datasheet numbers on the page become intuition. Keep a notebook of the serial output you expect before you press Run, so a wrong reading is caught by you and not by the simulator. And when a circuit refuses to behave, go to what actually stops beginners, which lists the four failure points in the order they bite — reversed LED, missing ground, pin 0/1, and a library that is not the one the sketch assumes. If you would rather learn from a book alongside the screen, the six beginner books compared here each note which of these 16 lessons they cover, so you do not buy a 800-page reference to learn what lesson 2 already shows you. A day-by-day plan is in how to learn Arduino.
Is the free Arduino simulator really free?
Yes, within limits worth stating plainly. The 3D board opens in any WebGL browser with no account, no download and no card, and lessons 1 and 2 — the pinout tour and the full LED blink — run free, which is enough to decide whether the browser is how you want to learn. The 16 written guides on this site are free as well, no account needed, and they carry the same wiring tables and sketches the simulator runs.
All 16 lessons inside the simulator unlock with a single one-time payment of $4.90 USD. That is a purchase, not a subscription: nothing renews, and there is no second tier above it. If you only want to read, the guides cost nothing; if you want to work through all 16 circuits in 3D and keep the progress rail moving to 16/16, that is what the payment covers.
Where the numbers come from
The figures on this page are not marketing round-ups. The pin map, the 32 KB of flash, the 20 mA per-pin recommendation and the 4.88 mV analog step are read off the ATmega328P datasheet and the Uno R3 board documentation; the language calls in the sketch are the ones defined in the Arduino reference. Each of the 16 lesson pages ends with its own source list, so a value you doubt can be checked at the original rather than taken from this page.
- Arduino language reference — pinMode(), digitalWrite(), delay(), analogRead()
- Arduino Uno Rev3 board documentation — pinout, current limits, 5 V and 3.3 V rails
- ATmega328P datasheet — 16 MHz, 32 KB flash, 2 KB SRAM, 10-bit ADC
Frequently asked questions
Can I practice Arduino wiring without hardware?
Yes, for the part most people get wrong. All 16 circuits are drawn fully wired on a 3D breadboard, and clicking any jumper, resistor or LED reports what it carries, its value and which leg is the anode, so you can check a circuit against the wiring table before you spend anything. The limit is honest: the model is pre-wired and you cannot drag a jumper into a different hole. Placing the four connections of lesson 2 — pin 13, a 220 Ω resistor, the LED, the ground rail — takes about ten minutes on a real Uno R3.
Is this Arduino simulator free?
Yes, to open and to use on lessons 1 and 2 — no account, no download, no card, and the board is fully interactive there. The 16 written guides on /lessons/ are free as well. All 16 lessons inside the 3D simulator unlock with a single one-time payment of $4.90 USD, which is not a subscription; there is no other paid tier on the site.
Can I run real Arduino code online?
Yes. In this Arduino simulator every lesson ships a complete C++ sketch — the blink sketch is 12 lines and uses only pinMode(), digitalWrite() and delay() — and pressing Run reports Compiling sketch…, Uploading to Arduino Uno… and Done uploading., then prints each pin change to the serial monitor as D13 → HIGH and D13 → LOW every 500 ms. The same 12 lines upload unchanged to a real Uno through Arduino IDE 2.x at 115200 baud.
Open the board, pick lesson 1, and wire your first circuit in about ten minutes.
Start the free Arduino simulatorPage written and checked against the running simulator by Nick Hu · last updated 19 November 2026 · published 2026-11-19.