Lesson 15 of 16 · 30 min
Arduino Force Sensor (FSR 402): Read Pressure
An FSR 402 falls from over 1 MΩ untouched to a few hundred ohms under firm pressure, and in a 10 kΩ voltage divider an Arduino reads that as a number that rises quickly for light touches and slowly for hard ones.
This lesson also runs on an interactive 3D board: wire it, press Run and watch the circuit respond.
Open the 3D lessonA force-sensing resistor is a polymer film whose resistance drops as you press it. It is a terrible scale — the response is logarithmic — but an excellent “how hard” detector, which is what most projects actually need.
In a divider with 10 kΩ to ground, the reading climbs fast at first: 50 g reads about 460, 100 g about 640, 200 g about 760 and 500 g only about 870. Ten times the weight gives less than twice the number, so map() is best calibrated against your own press rather than against grams.
What you need
| Part | Qty | Notes |
|---|---|---|
| Arduino Uno R3 | 1 | A0 reads the pad, pin 9 moves the needle |
| FSR 402 | 1 | 18 mm round pad with a 2-pin tail |
| 10 kΩ resistor | 1 | The fixed half of the divider |
| SG90 servo | 1 | The gauge needle |
| Piezo buzzer | 1 | The bell |
| Breadboard + jumpers | 1 |
How to wire it
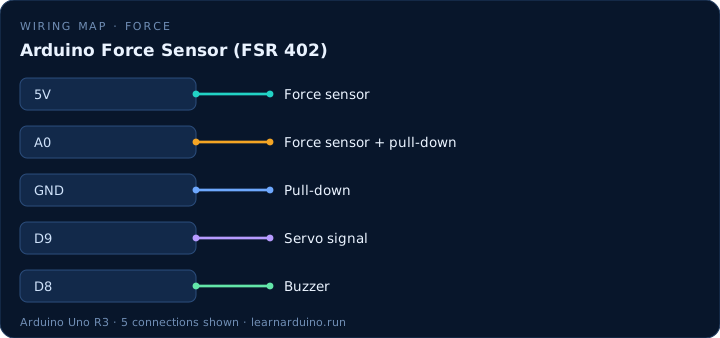
5 V → FSR → A0, and A0 → 10 kΩ → GND. Servo signal → pin 9 (brown to GND, red to 5 V). Buzzer + → pin 8, − → GND. Mount the FSR flat on a hard surface so the whole pad takes the load.
| Pin | Connects to | What it does |
|---|---|---|
| 5V | Force sensor | One side of the pad (and the servo’s power). |
| A0 | Force sensor + pull-down | The divider: higher the harder you press. |
| GND | Pull-down | Holds A0 at 0 V while nobody presses. |
| D9 | Servo signal | Sets the needle’s angle. |
| D8 | Buzzer | Rings the bell. |
Reading an Arduino force sensor
The FSR 402 is a polymer film, not a load cell. Untouched it is above 1 MΩ; a firm press brings it to a few hundred ohms. Put it in a divider with 10 kΩ to ground and the analog pin sees a voltage that rises with pressure — quickly at first, slowly after that, because the response is logarithmic.
The fixed resistor sets the range. 10 kΩ suits hand pressure, 100 kΩ is better for a light touch, 1 kΩ for something heavy. Mount the pad on a flat rigid surface and press the round area: the crimp where the tail meets the film is the part that breaks, and bending it is how these sensors die.
From raw readings to a usable scale
Forget grams. Part-to-part variation is large and the curve is logarithmic, so calibrate three states instead — light, medium, hard — and put two thresholds between them. That is what a grip sensor, a drum pad or a step detector actually needs.
Then map() the result onto the output you have: a servo angle for a gauge, a PWM value for a lamp, a note for a buzzer. If the project has to tell a tap from a press, add time — a press under 150 ms is a tap, anything longer is a hold — and debounce it like a button and the pad becomes reliable enough to build on.
The sketch
#include <Servo.h>

const int FSR = A0;
const int BELL = 8;
const int NEEDLE = 9;
const long PULLDOWN = 10000;  // ohms, A0 to GND

Servo needle;
int best = 0;                 // the hardest press lately
unsigned long bestAt = 0;

void setup() {
  needle.attach(NEEDLE);
  Serial.begin(9600);
}

void loop() {
  int force = analogRead(FSR);   // rises with pressure

  // a harder press takes over; the needle lets go after 2 s
  if (force >= best || millis() - bestAt > 2000) {
    best = force;
    bestAt = millis();
  }
  needle.write(map(best, 0, 1023, 0, 180));

  if (best > 800) {              // past the mark: ding
    tone(BELL, 1568, 400);
    best = 0;                    // reset for the next try
  }

  if (force > 10) {              // print the pad's resistance
    long ohms = PULLDOWN * (1023L - force) / force;
    Serial.print(force);
    Serial.print("  ");
    Serial.print(ohms);
    Serial.println(" ohms");
  }
  delay(20);
}
What the code does
- analogRead(FSR) rises as you press, because the pad’s resistance falls and the divider’s midpoint rises with it.
- PULLDOWN * (1023 − force) / force is the divider formula rearranged, giving the sensor’s own resistance in ohms.
- best and bestAt make the needle peak-and-hold, like a fairground strength tester.
- map(best, 0, 1023, 0, 180) turns the reading into a servo angle, and tone() rings once when the record passes the mark.
Specifications
| Item | Value |
|---|---|
| Sensor | FSR 402, 18 mm round pad |
| Force range | About 0.2–20 N (20 g to 2 kg) |
| Resistance | Over 1 MΩ untouched, a few hundred Ω pressed hard |
| Accuracy | Good for “how hard”, not for weighing things |
| Needle | SG90 servo, 0–180° |
Common mistakes
- Putting the FSR the other way round in the divider. With the pad to ground the reading falls as you press, and every threshold is backwards.
- Expecting grams. The datasheet curve is logarithmic and part-to-part variation is large; calibrate for “light, medium, hard” instead.
- Pressing on the edge or bending the tail. The sensitive area is the round pad; the crimp at the tail is the first thing to break.
Sources
The figures in this lesson come from these documents. Every value in the tables above can be checked against them.
- FSR 402 — force-resistance curve
- analogRead() — Arduino language reference
- Analog inputs — how the Uno's ADC works
Frequently asked questions
Can an FSR weigh things accurately?
No. Repeatability is around ±10% and the response is logarithmic, so it works for detecting a press, a step or a grip, but not for a scale. Use a load cell with an HX711 for actual grams.
What resistor should I pair with an FSR?
10 kΩ suits hand-pressure ranges. For a small touch, use 100 kΩ; for a heavy load, 1 kΩ. The resistor sets where the divider is most sensitive.
Why does my FSR read 0 until I press hard?
At rest the pad is nearly an open circuit, so the pull-down holds the pin at 0. Real pressure needs to bring it below a few hundred kΩ before the ADC sees anything.
Can I use an FSR as a switch?
Yes, and it is often better than a button: any reading above a small threshold counts as a press, so a light touch triggers it. Add hysteresis so a resting hand does not chatter.
Want to see this circuit before you own the parts? The Arduino simulator draws this exact pin table on a 3D Uno R3: click any jumper to see what it carries, press Run and read the serial monitor.
Open the Arduino simulatorPublished 12 November 2026 · last updated 19 November 2026 · written and tested by Nick Hu.